Scratch
archived forums
#1 2011-07-31 16:53:56
- spongebob123
- Scratcher
- Registered: 2009-05-10
- Posts: 1000+
Sock dragon tutorial help?
I'd like to make a dragon plush out of two adult-sized tube socks. Does anyone have any tutorials? I can't seem to find one. Help?
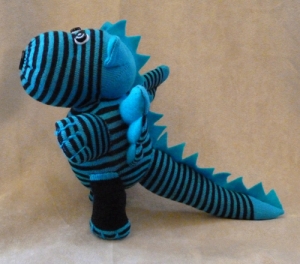
EDIT: Found a tutorial at http://emmalm.wordpress.com/2010/11/02/ … ck-dragon/. Is this ok for beginners? I also need help with the different kinds of stitches.. 
Last edited by spongebob123 (2011-07-31 17:22:52)
Offline
#2 2011-07-31 17:34:10
- spongebob123
- Scratcher
- Registered: 2009-05-10
- Posts: 1000+
Re: Sock dragon tutorial help?
Help?
Offline
#3 2011-07-31 17:41:34
- samurai768
- Scratcher
- Registered: 2009-07-21
- Posts: 1000+
Re: Sock dragon tutorial help?
It should be fine for a beginner, but just a little difficult  I've done stuff like that, and it shouldn't be too hard. If you need help with the stitches my suggestion is to go to google. That dragon is SOOO cute! I might wanna try that later
Offline
#4 2011-07-31 17:55:30
- spongebob123
- Scratcher
- Registered: 2009-05-10
- Posts: 1000+
Re: Sock dragon tutorial help?
"Take the body (and this is the head too) section, turn inside out, put a row of running stitches round the end which was nearest the sock’s toe (left hand side as you look at the cutting pattern. Pull tight and knot off leaving one long end on thread. Turn the sock the right way out and if necessary add a few more stitches across the join to smooth out, it doesn’t need to be perfect as it will be hidden by the button nose later. Stuff until soft and squashy, try to make two separate sections of stuffing for the head and the body at this point. Run another line of running stitch around the end to close, taking care to tuck the raw edges in and add some stitches across if required, again doesn’t have to be too neat as the tail will cover later."
Could someone please explain what exactly "put a row of running stitches round the end which was nearest the sock’s toe (left hand side as you look at the cutting pattern)" means. I am confused about how exactly to put the running stitches..
Offline
#5 2011-07-31 17:58:03
- samurai768
- Scratcher
- Registered: 2009-07-21
- Posts: 1000+
Re: Sock dragon tutorial help?
It's just a basic stitch, don't let the weird name confuse you 
Here: http://en.wikipedia.org/wiki/Running_stitch
Offline
#6 2011-07-31 18:02:24
- spongebob123
- Scratcher
- Registered: 2009-05-10
- Posts: 1000+
Re: Sock dragon tutorial help?
samurai768 wrote:
It's just a basic stitch, don't let the weird name confuse you
Here: http://en.wikipedia.org/wiki/Running_stitch
I know what the Running Stitch is, I'm just confused a little on where exactly on the body to put the row of running stitches.. "round the end which was nearest the sock’s toe " seems a little unclear to me. What do they mean by "round the end"?
Offline
#7 2011-07-31 18:04:27
- samurai768
- Scratcher
- Registered: 2009-07-21
- Posts: 1000+
Re: Sock dragon tutorial help?
spongebob123 wrote:
samurai768 wrote:
It's just a basic stitch, don't let the weird name confuse you
Here: http://en.wikipedia.org/wiki/Running_stitchI know what the Running Stitch is, I'm just confused a little on where exactly on the body to put the row of running stitches.. "round the end which was nearest the sock’s toe " seems a little unclear to me. What do they mean by "round the end"?
Around? IDK. Maybe it's a sewing term? You could try wait for cheddargirl to show up. She knows alot about sewing
Offline
#8 2011-07-31 18:07:08
- spongebob123
- Scratcher
- Registered: 2009-05-10
- Posts: 1000+
Re: Sock dragon tutorial help?
samurai768 wrote:
spongebob123 wrote:
samurai768 wrote:
It's just a basic stitch, don't let the weird name confuse you
Here: http://en.wikipedia.org/wiki/Running_stitchI know what the Running Stitch is, I'm just confused a little on where exactly on the body to put the row of running stitches.. "round the end which was nearest the sock’s toe " seems a little unclear to me. What do they mean by "round the end"?
Around? IDK. Maybe it's a sewing term? You could try wait for cheddargirl to show up. She knows alot about sewing
Ok. I'll make the legs meanwhile, since cheddargirl's not online, I think.
Offline
#9 2011-07-31 19:43:47
- spongebob123
- Scratcher
- Registered: 2009-05-10
- Posts: 1000+
Re: Sock dragon tutorial help?
"try to make two separate sections of stuffing for the head and the body at this point."
How do I do that?
Offline
#10 2011-08-01 12:03:57
- spongebob123
- Scratcher
- Registered: 2009-05-10
- Posts: 1000+
Re: Sock dragon tutorial help?
bump
Offline
#11 2011-08-01 13:45:40
- cheddargirl
- Scratch Team
- Registered: 2008-09-15
- Posts: 1000+
Re: Sock dragon tutorial help?
Huh, the tutorial images aren't loading for me (supposedly they don't exist). This is gonna be super, super hard to interpret without pics to see what they're talking about.
spongebob123 wrote:
"try to make two separate sections of stuffing for the head and the body at this point."
How do I do that?
From my experience with plushies, you basically stuff the body parts really fully while you stuff joints lightly - I'm gonna go out on a limb here and assume that's what the tutorial is talking about.
Basically, the head is going to be full of one giant wad of stuffing, the body another wad of stuffing, and the neck a small amount of stuffing so the neck can bend.
spongebob123 wrote:
I know what the Running Stitch is, I'm just confused a little on where exactly on the body to put the row of running stitches.. "round the end which was nearest the sock’s toe " seems a little unclear to me. What do they mean by "round the end"?
I've never heard of the term "round the end". It's really hard to say without images, but I think it's a typo and that they meant "around the end".

Everything is better when you add a little cheddar, because when you have cheese your life is at ease
Offline
#12 2011-08-01 18:33:29
- spongebob123
- Scratcher
- Registered: 2009-05-10
- Posts: 1000+
Re: Sock dragon tutorial help?
cheddargirl wrote:
Huh, the tutorial images aren't loading for me (supposedly they don't exist).
spongebob123 wrote:
"try to make two separate sections of stuffing for the head and the body at this point."
How do I do that?From my experience with plushies, you basically stuff the body parts really fully while you stuff joints lightly - I'm gonna go out on a limb here and assume that's what the tutorial is talking about.
Basically, the head is going to be full of one giant wad of stuffing, the body another wad of stuffing, and the neck a small amount of stuffing so the neck can bend.spongebob123 wrote:
I know what the Running Stitch is, I'm just confused a little on where exactly on the body to put the row of running stitches.. "round the end which was nearest the sock’s toe " seems a little unclear to me. What do they mean by "round the end"?
I've never heard of the term "round the end". It's really hard to say without images, but I think it's a typo and that they meant "around the end".


Here are the images. Strange, I see them. They DO exist.. do other images not appear?
"Put a line of running stitches around the neck and pull tight, this should sit between the head and body stuffing sections and create a neck." So, basically, once you make the head and body stuffed, you make a sort of very tight "necklace" from running stitches, I think.. I can always take another old sock and use it to make a body, since the section I'm currently using, is around 6 and a half inches in length.
Last edited by spongebob123 (2011-08-01 18:34:17)
Offline
#13 2011-08-01 19:36:15
- cheddargirl
- Scratch Team
- Registered: 2008-09-15
- Posts: 1000+
Re: Sock dragon tutorial help?
spongebob123 wrote:
cheddargirl wrote:
Huh, the tutorial images aren't loading for me (supposedly they don't exist).
spongebob123 wrote:
"try to make two separate sections of stuffing for the head and the body at this point."
How do I do that?From my experience with plushies, you basically stuff the body parts really fully while you stuff joints lightly - I'm gonna go out on a limb here and assume that's what the tutorial is talking about.
Basically, the head is going to be full of one giant wad of stuffing, the body another wad of stuffing, and the neck a small amount of stuffing so the neck can bend.spongebob123 wrote:
I know what the Running Stitch is, I'm just confused a little on where exactly on the body to put the row of running stitches.. "round the end which was nearest the sock’s toe " seems a little unclear to me. What do they mean by "round the end"?
I've never heard of the term "round the end". It's really hard to say without images, but I think it's a typo and that they meant "around the end".
http://emmalm.files.wordpress.com/2010/ … &h=300
http://emmalm.files.wordpress.com/2010/ … &h=264
http://emmalm.files.wordpress.com/2010/ … &h=300
Here are the images.
"Put a line of running stitches around the neck and pull tight, this should sit between the head and body stuffing sections and create a neck." So, basically, once you make the head and body stuffed, you make a sort of very tight "necklace" from running stitches, I think.. I can always take another old sock and use it to make a body, since the section I'm currently using, is around 6 and a half inches in length.
I see them now.
You know how a cloth kind of bunches up when you pull on a running stitch? That's pretty much it. You're right, the running stitches act like a tight necklace to make a neck.
Everything is better when you add a little cheddar, because when you have cheese your life is at ease
Offline
#14 2011-08-02 14:50:30
- spongebob123
- Scratcher
- Registered: 2009-05-10
- Posts: 1000+
Re: Sock dragon tutorial help?
cheddargirl wrote:
spongebob123 wrote:
cheddargirl wrote:
Huh, the tutorial images aren't loading for me (supposedly they don't exist).
spongebob123 wrote:
"try to make two separate sections of stuffing for the head and the body at this point."
How do I do that?From my experience with plushies, you basically stuff the body parts really fully while you stuff joints lightly - I'm gonna go out on a limb here and assume that's what the tutorial is talking about.
Basically, the head is going to be full of one giant wad of stuffing, the body another wad of stuffing, and the neck a small amount of stuffing so the neck can bend.
I've never heard of the term "round the end". It's really hard to say without images, but I think it's a typo and that they meant "around the end".http://emmalm.files.wordpress.com/2010/ … &h=300
http://emmalm.files.wordpress.com/2010/ … &h=264
http://emmalm.files.wordpress.com/2010/ … &h=300
Here are the images.
"Put a line of running stitches around the neck and pull tight, this should sit between the head and body stuffing sections and create a neck." So, basically, once you make the head and body stuffed, you make a sort of very tight "necklace" from running stitches, I think.. I can always take another old sock and use it to make a body, since the section I'm currently using, is around 6 and a half inches in length.I see them now.
You know how a cloth kind of bunches up when you pull on a running stitch? That's pretty much it. You're right, the running stitches act like a tight necklace to make a neck.
Yeah. I'm going to sew my original body (now head) to another piece of sock (with evil old stains! > ) and attach the rest.
Offline